PingInfoView is a compact and portable network monitoring tool developed by NirSoft, designed to simplify the process of checking network connectivity. It allows users to ping multiple IP addresses or hostnames simultaneously, offering an efficient solution for network diagnostics. With its lightweight design, PingInfoView doesn’t require installation, making it an ideal choice for those who need a quick, on-the-go tool for monitoring network health.
Whether you’re a network administrator, IT professional, or casual user, PingInfoView makes it easy to track response times, success rates, and ping failures. This tool is invaluable for troubleshooting connectivity issues, ensuring server uptime, or monitoring network performance over time.
System Requirements for PingInfoView
PingInfoView is a lightweight and efficient network monitoring tool designed to work on most Windows-based systems. Here are the key system requirements to ensure smooth operation:
Supported Operating Systems
PingInfoView is compatible with a variety of Windows versions:
- Windows 7
- Windows 8
- Windows 10
- Windows 11
The tool supports both 32-bit and 64-bit versions of Windows. Choose the appropriate version based on your system’s architecture.
Processor
Minimum Requirements:
- Any modern processor (e.g., Intel or AMD) will easily run PingInfoView. Even older processors are more than sufficient due to the tool’s lightweight nature.
Recommended:
- A processor with a speed of 1.0 GHz or higher will provide optimal performance, though the program doesn’t require high-end specs.
RAM (Memory)
Minimum RAM:
- 1 GB of RAM is more than enough to run PingInfoView efficiently.
Recommended RAM:
- If you’re running multiple programs simultaneously, 2 GB of RAM or more will ensure smooth operation without any slowdowns.
Storage Requirements
Disk Space:
- PingInfoView is an extremely small application. It typically requires only 100 KB to 1 MB of free space on your computer or USB drive.
- Because it is a portable tool, you don’t need to install it on your computer’s hard drive; you can run it directly from a USB stick or external storage.
Network Requirements
For Downloading:
- You’ll need an active internet connection to download PingInfoView from the NirSoft website.
For Usage:
- Once downloaded, PingInfoView can be used without an internet connection unless you are pinging external IP addresses or websites.
Software Dependencies
No Additional Software Needed:
- PingInfoView is a standalone application. It doesn’t rely on other software like the .NET Framework, making it easy to use with minimal system overhead.
User Permissions
Admin Rights Not Required:
- You can run PingInfoView without administrator privileges in most cases. However, if you’re working in a restricted environment or need access to specific network resources, you might need to run the tool with elevated rights.
Downloading PingInfoView: Step-by-Step Guide
Visit the Official NirSoft Website
Why This Step is Important:
- PingInfoView is a tool developed by NirSoft, a trusted software company. To ensure that you’re downloading the latest version of the program safely, it’s best to get it from NirSoft’s official website rather than third-party sources.
How to Do It:
- Open your preferred web browser (like Google Chrome, Firefox, Edge).
- Go to the NirSoft website by typing this address into the URL bar:
- https://www.nirsoft.net/utils/multi_ping_tool.html
- This link will take you directly to the page for PingInfoView.
Locate the Download Link
Finding the Download Section:
- On the PingInfoView page, look for a download button or a link that says something like “Download PingInfoView.” This is usually displayed in a prominent position on the webpage.
- If you scroll down, you may also see a link to a ZIP file or direct download options.
Select the Correct Version for Your System
32-bit vs 64-bit:
PingInfoView is available for both 32-bit and 64-bit versions of Windows. Here’s how you can choose:
- 64-bit Version: If your Windows is 64-bit (which most modern computers use), choose the 64-bit version.
- 32-bit Version: If you’re using an older computer with a 32-bit system, select the 32-bit version.
How to Check Your System Type:
- Go to Settings > System > About.
- Under Device specifications, look for System type. It will tell you if you have a 64-bit or 32-bit version of Windows.
Download the ZIP File
- Once you’ve selected the appropriate version (32-bit or 64-bit), click on the download link.
- What Happens Next: Your browser will start downloading a ZIP file that contains PingInfoView.
- File Name: The file will typically be named something like pinginfoview-x64.zip (for 64-bit) or pinginfoview-x86.zip (for 32-bit).
- Where to Save: Most browsers automatically save the file to your Downloads folder, but you can choose a different location if you want.
Optional (Verify File Size):
- If you’re concerned about the integrity of the file, NirSoft usually provides checksum (MD5/SHA1) values. You can verify the downloaded file by comparing its hash with the one listed on the site to ensure it’s not corrupted.
Extract the ZIP File
Why You Need to Extract:
- PingInfoView doesn’t need installation because it’s a portable tool. However, it comes in a compressed ZIP file, so you’ll need to extract it before you can use it.
How to Extract:
- Navigate to the Downloads folder (or the folder where you saved the ZIP file).
- Right-click the ZIP file and select Extract All… (this option might vary depending on your system or extraction software).
- Choose where to extract the files. You can extract it to your Desktop or a dedicated folder like PingInfoView for easier access.
- Once extracted, you’ll find a file called PingInfoView.exe inside the folder.
Open and Run PingInfoView
Running the Tool:
- PingInfoView is a portable application, you don’t need to install it like a regular program. Just follow these steps:
- Go to the folder where you extracted the files.
- Double-click on PingInfoView.exe to launch the application.
What to Expect:
- Upon opening, PingInfoView will display a simple interface where you can start adding IP addresses or hostnames to ping and monitor network performance.
Troubleshooting
File Not Downloading:
- If the download doesn’t start or if your browser blocks the file, make sure you’re downloading from the official NirSoft website and not a third-party site.
Anti-virus Alert:
- Sometimes, anti-virus programs flag downloaded files as suspicious. PingInfoView is safe, but if it gets flagged, you may need to whitelist it or temporarily disable your anti-virus during the download.
File Doesn’t Extract:
- If you have trouble extracting the ZIP file, make sure you have a file extraction tool like WinRAR or 7-Zip installed. These are free tools that can help you open ZIP files.
Extracting the Files for PingInfoView
PingInfoView is a portable application, it doesn’t require installation. After downloading the tool, you need to extract the files to access and run the program. Here’s how to do it step by step:
Why Do You Need to Extract the Files?
When you download PingInfoView, it will come in a ZIP file format. This is a compressed folder that contains all the necessary program files. To use PingInfoView, you need to extract (unzip) these files first.
Steps to Extract the Files:
Locate the ZIP File
- After downloading the PingInfoView ZIP file, it will usually be saved in your computer’s default download folder. Find the file (it will have the .zip extension) in your Downloads folder or wherever you saved it.
Right-click on the ZIP File
- Once you’ve found the downloaded ZIP file, right-click on it to open a context menu.
Choose the “Extract” Option
- If you’re using Windows’ built-in tool, select “Extract All…”.
- Alternatively, if you have third-party software like WinRAR or 7-Zip, you can choose “Extract Here” or “Extract to [folder name]” to unzip the files directly into a new folder.
Select a Destination Folder
- A window will pop up asking you to choose where you’d like to store the extracted files. You can either choose an existing folder or create a new one (for example, “PingInfoView”).
- It’s a good idea to store it somewhere easy to find, like your desktop or a dedicated folder for utilities.
Click “Extract”
- After selecting your destination folder, click “Extract” or “OK” to begin the extraction process. The files will be unzipped and placed in the folder you chose.
What You’ll Find After Extraction
Once the extraction is complete, you’ll find the following files in your chosen folder:
- PingInfoView.exe: This is the main program file. Double-click this to run PingInfoView.
- Readme.txt (optional): A file that may contain useful information or instructions for using PingInfoView.
Why No Installation Is Required
PingInfoView is a portable tool, which means it doesn’t need to be installed on your system. All the program files are contained within the extracted folder. Simply double-click PingInfoView.exe to run the program—it will open right away without needing any installation steps.
Optional: Creating a Shortcut for Easy Access
To make it easier to launch PingInfoView, you can create a shortcut on your desktop or taskbar. Right-click on the PingInfoView.exe file, then select “Create shortcut”. This way, you’ll have quick access to the program whenever you need it.
Running PingInfoView
Once you’ve downloaded and extracted PingInfoView, running the program is quick and easy. Here’s a step-by-step guide to get you started:
Locate the Extracted Folder
- After extracting the ZIP file, go to the folder where you saved the contents.
- Inside the folder, you’ll find the PingInfoView.exe file, which is the program’s executable file.
Launch PingInfoView
Double-click the PingInfoView.exe file:
- Simply double-click on this file to open the application. Since PingInfoView is a portable tool, there’s no installation required—just open and go!
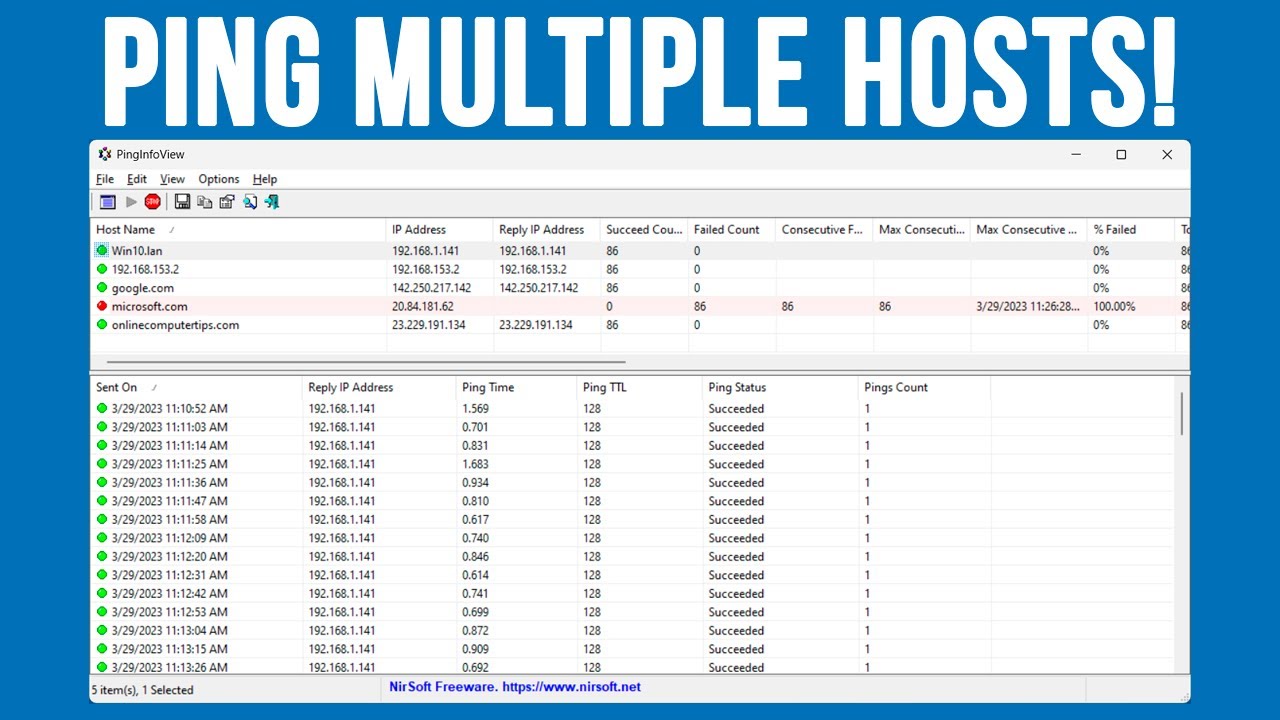
Understanding the Interface
- Upon launch, you’ll be greeted with the main window of PingInfoView, which will initially be blank.
- The interface provides you with a simple, clean design for adding hostnames or IP addresses that you want to ping.
Adding IPs or Hostnames (Optional)
- To start pinging, you’ll need to add the IP addresses or domain names you want to monitor.
- You can manually enter the IPs or hostnames, or even import a list from a text file to save time.
Customizing Settings (Optional)
Adjust the Ping Interval and Timeout:
- If you prefer specific settings for the ping test (e.g., how frequently it pings or the duration to wait for a response), you can customize these options under the Options menu.
Sound Alerts:
- You can set up sound notifications for when a ping fails, so you’re alerted immediately if there are any network issues.
Start the Monitoring Process
- Once your targets are set up, click the Start button to begin monitoring.
- PingInfoView will begin pinging the IPs or hostnames you’ve added, and it will display the results in real-time, showing the response times and the status of each target.
Running in the Background (Optional)
- To keep things unobtrusive, you can minimize PingInfoView to the system tray, allowing it to run in the background while you go about other tasks.
- The tool will continue monitoring the network, and you can easily check back later for an update on the results.
Closing PingInfoView
- When you’re done, simply click the X in the top-right corner to close the program, or exit through the File menu for a clean exit.
First-Time Setup of PingInfoView
When you first open PingInfoView, it’s easy to get started with monitoring your network hosts. Here’s a streamlined guide to walk you through the setup process:
Launching PingInfoView
- Open the Program: After extracting the ZIP file, simply double-click on PingInfoView.exe to launch the application.
- Initial Interface: Upon opening, you’ll see an empty list of hosts and no data displayed yet. This is normal for a fresh setup.
Adding Hosts or IP Addresses
Adding Hosts Manually:
- Click the “Add” button located on the toolbar or right-click in the main window to bring up the add dialog.
- Type in the IP address or hostname (e.g., 192.168.1.1 or google.com) you want to monitor.
- You can repeat this step to add multiple hosts.
- Importing a List: If you have a list of addresses, you can import them by selecting “Import From Text File” and choosing your file.
Configuring Ping Settings (Optional but Recommended)
- Adjust Ping Interval: Control how often PingInfoView sends pings to each host.
- Go to “Options” > “Advanced Options” and set a preferred interval (e.g., 5 seconds).
- Set Timeout: Define how long PingInfoView should wait for a response before marking it as failed.
- A reasonable timeout, such as 3000 ms, ensures you don’t miss brief network issues.
- Set Retry Count: Decide how many times PingInfoView should retry pinging a host before considering it down.
Enabling Notifications (Optional)
- Alert for Ping Failures: Set up alerts to notify you when a host goes down.
- Enable sound alerts by going to “Options” > “Play a sound when a host fails”.
- Custom Notifications: For advanced users, set up custom scripts or tools to trigger on failure (optional).
Saving Your Configuration
- Save Hosts List: To keep your hosts for future sessions, save your current configuration:
- Click on “File” in the menu bar.
- Select “Save Hosts List“, then choose a location on your computer.
- Load Saved Lists: If you’ve saved your configuration before, you can quickly load it by selecting “File” > “Load Hosts List”.
Starting the Ping Monitoring
- After adding your hosts and configuring the settings, simply click on “Start” (button in the toolbar) to begin pinging.
- PingInfoView will now continuously monitor the hosts you added, displaying response times, success rates, and detailed statistics for each one.
Fine-Tuning Your Settings
- As you use PingInfoView over time, you may find you want to adjust certain settings—whether it’s changing the ping interval, modifying the timeout, or enabling additional alerts.
- You can revisit the “Advanced Options” menu anytime to make those adjustments.
Troubleshooting Guide: Resolving Common Issues with PingInfoView
Missing Files After Extraction
Issue:
Occasionally, users report missing or incomplete files after extracting the ZIP archive.
Solution:
- Re-download the Tool: If files are missing, download PingInfoView again from the official NirSoft website to ensure you’re getting the latest version from a trusted source.
- Proper Extraction: Use reliable extraction software like WinRAR or 7-Zip. Make sure to extract the files to a fresh folder to avoid overwriting previous files.
- View Hidden Files: Sometimes, certain files might be hidden. Ensure that your file explorer is set to show hidden files to confirm everything is extracted properly.
Anti-virus Flagging PingInfoView as Malware
Issue:
- Some anti-virus programs may mistakenly flag
- PingInfoView as malware, even though it is completely safe.
Solution:
- Temporarily Disable Anti-virus: If the tool is blocked, temporarily disable your anti-virus software to allow you to extract and run PingInfoView. Be sure to enable it again afterward.
- Add to Whitelist: Add the PingInfoView.exe file to your anti-virus software’s whitelist or exclusions list to prevent future false positives.
- Verify NirSoft’s Reputation: PingInfoView comes from NirSoft, a trusted developer. If you’re concerned, check online forums or review sites to confirm the legitimacy of the tool.
PingInfoView Not Launching or Crashing
Issue:
If PingInfoView fails to open or crashes upon starting, this might be due to compatibility or system issues.
Solution:
- Run as Administrator: Right-click the executable and select “Run as administrator” to ensure the program has the necessary system permissions.
- Check System Compatibility: Verify that your operating system is compatible with PingInfoView. It works on Windows 7 and later, so make sure your version is up to date.
- Update System Libraries: Ensure your system has the latest updates installed, including .NET Framework and Visual C++ Redistributables, which PingInfoView might depend on.
Issues Exporting Data
Issue:
Some users may face errors when trying to export ping results or the data doesn’t save correctly.
Solution:
- Check File Permissions: Ensure you’re saving the export to a location where you have write permissions (e.g., Desktop or Documents).
- Use Valid File Formats: When exporting, ensure the format you choose (TXT, CSV, HTML, etc.) is valid and there are no invalid characters in the filename.
- Ensure Enough Disk Space: Make sure your hard drive has enough available space, especially if you are saving large export files.
Network Errors or Ping Timeouts
Issue:
PingInfoView might show timeouts or network errors when trying to ping certain IP addresses.
Solution:
- Check Your Network Connection: Confirm that your device is properly connected to the internet or your local network.
- Verify Target IP/Hostname: Double-check the IP addresses or domain names you’re pinging to ensure they are valid and reachable. A small typo can lead to errors.
- Adjust Timeout Settings: If you’re pinging slower hosts, consider increasing the timeout setting in PingInfoView to accommodate longer response times.
Error Messages or Freezing Issues
Issue:
If you encounter error messages or PingInfoView freezes during operation, it might be due to system conflicts or insufficient resources.
Solution:
- Close Unnecessary Programs: Close any non-essential applications that may be consuming system resources, as they could interfere with PingInfoView.
- Perform a Clean Boot: To avoid software conflicts, try performing a clean boot of Windows, disabling non-essential startup programs and services.
- Update PingInfoView: Ensure you’re running the latest version of PingInfoView, as developers release regular updates to fix bugs and improve functionality.
Configuration Settings Not Saving
Issue:
Some users experience issues with PingInfoView not saving their configuration settings after closing the program.
Solution:
- Check Permissions: Ensure PingInfoView has the required permissions to write its configuration files, especially if it’s located in a restricted folder like “Program Files.”
- Move to a Different Folder: If you suspect a permissions issue, try moving PingInfoView to a more accessible location, like your Desktop, and then reconfigure it.
- Check for Conflicting Software: Some security or optimization tools might block settings from being saved. Try disabling such software temporarily to see if it resolves the issue.
Conclusion
PingInfoView offers a straightforward and hassle-free experience for users who need to monitor their network’s health. With its portable design, there’s no installation required—simply extract the ZIP file and run the executable. This simplicity makes it an ideal solution for both casual users and IT professionals who need an efficient way to check network performance without the complexity of larger software.
Beyond its ease of use, PingInfoView delivers valuable insights into network connectivity with real-time ping statistics, response times, and failure logs. Its customizable settings and export options make it a powerful, flexible tool for anyone seeking reliable network diagnostics.